Odoo - Demand Planning
- Palmate Techologies
- May 5, 2020
- 9 min read
Updated: May 17, 2020

Introduction
Demand Planning feature can be used to analyze your stock demand needs based on historical sales data, determine replenishment requirements, and then create either purchase or manufacturing orders according to a supply plan that will add stock as needed. Historical sales data is fetched from both sales and pos orders. For sales order, Odoo looks at Order Date and Delivered Qty field.
The process consists of 3 steps:
Create Demand Plans
Create Supply Plans
Purchase/Manufacturing Order Creation
Technical Name : demand_planningRequired Apps
•Inventory Management (stock)
•Manufacturing (mrp)
•Sales (sale)
•Point of Sale (point_of_sale)
•Purchase Management (purchase)
•Invoicing (account)
Product Configuration
To set up a product for demand planning:
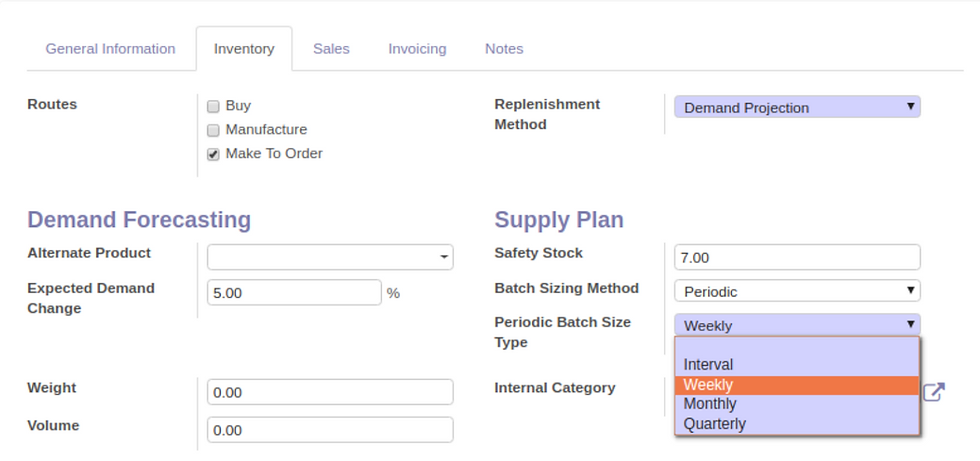
Replenishment Method: Select Demand Planning. When you choose this setting, all minimum stock rules for this product will be disabled. Also, the reodering rule scheduler will skip these products. Orders will be created strictly based on demand plans.
For Demand Projection:
Alternate Product: Choose another product if you want Odoo to examine the historical sales of a product other than the one on the current record. When this field is left blank, the source for historical data is the original product. For example, if you are setting up Product A for demand planning, but Product A does not have an extensive sales history, you can choose Product B as an alternate source for historical data. Then, when demand calculations need to be made for Product A, Odoo uses Product B's history for the calculations.
Expected Demand Change: Enter a percentage to increase the forecasted amount. For example, demand is projected at 100 units for this upcoming July based on sales last July. But you know that sales for this product have been trending upwards the last two months, and you want calculations to mirror this trend. You can enter a percentage to increase the expected demand beyond the calculated amount.
For Supply Plan:
Safety Stock: This is a measure of the amount of stock you want to keep on hand to account for variations in demand so that you do not run out. It is a buffer amount of a product you prefer to keep in stock at all times. For example, if you enter 5, then after demand projections are made, an additional 5 units are added to the quantity required on supply plans.
Batch Sizing Method: Choose one of the following:
No selection: Aggregated purchase orders or manufacturing orders will be generated based on demand dates.
Fixed: Enter a quantity in the Fixed Batch Size field. This is the quantity that procurement of this product is always based on, regardless of demand projections.
Periodic: Select this option to generate aggregated purchase orders or manufacturing orders based on the overall demand requirements extended over a designated period, such as weekly or monthly. You need to select one of these values in the Periodic Batch Size Type field:
Interval: Order aggregation continues for a fixed number of days defined in the Interval field.
Weekly: Order aggregation starts at the beginning of each week. The requirement date is set to Sunday.
Monthly: Order aggregation starts at the beginning of each month. The requirement date is always the first day of each month.
Quarterly: Order aggregation starts at the beginning of each quarter. The requirement date is always the first day of each quarter.
Demand Forecasting
User should belong to Demand Forecasting Manager group in order to have access to this feature.
Generate Product Demand Plan
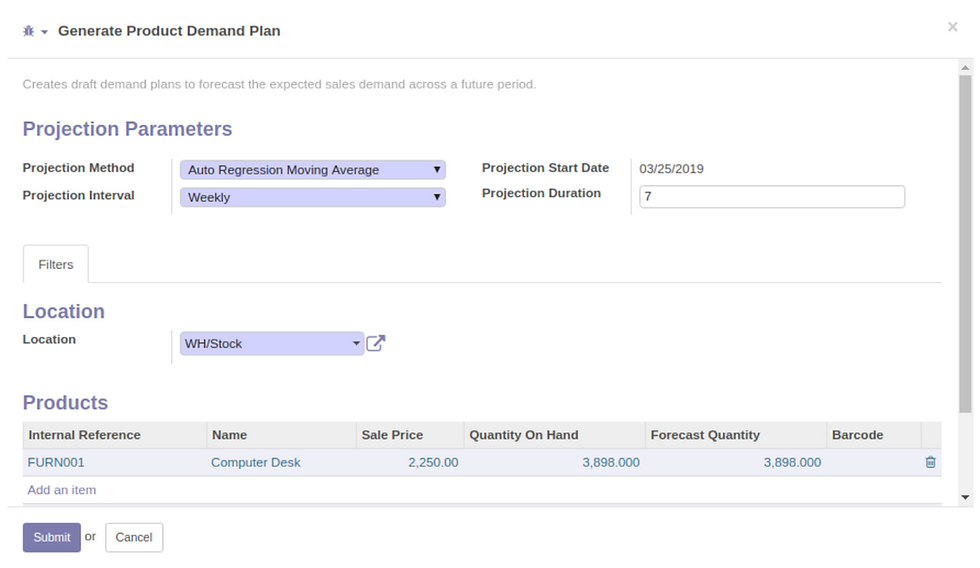
You can generate product demand to forecast the expected demand across a future period. Generate Product Demand Plan wizard initiates the process to assess previous demand for products and generate the estimated upcoming demand.
For example, you can look at the demand for a product across the previous years to forecast the expected demand for the next six months.
To generate demand, you must choose a projection method and determine the length of the period to forecast for. Odoo uses this forecast data to project estimated demand across a designated time period in the future and then suggests a plan for orders accordingly.
If any draft plan exist for that product and location, it will be deleted. Incase of existing locked plans, Odoo will generate a plan after the existing plans last end date. If there is no new projection in the current plan, then it will exit with the message "Projected data already exist" in the logs.
After you submit the Generate Product Demand Plan page, a demand plan is created for each selected product. Demand plans record the expected future demand for a product based on previous demand. After demand plans are created, you can view and edit the demand plans and use them to create supply plans for products.
To generate product demand:
Go to Demand Planning > Demand Forecasting > Generate Product Demand Plan.
Projection method: Select one of the following values
Auto Regression: In this technique, predictions are taken as observations at previous time steps, called lag variables. Because the regression model uses data from the same input variable at previous time steps, it is referred to as an autoregression (regression of self).
Rolling Average: In this technique, the rolling average is calculated by averaging the most recent number of periods specified by Historical Duration field. This average is used for all periods in the projection.
Moving Average: In this technique, the next step in the sequence is predicted as a linear function of the residual errors from a mean process at prior time steps.
Auto Regression Moving Average: This method models the next step in the sequence as a linear function of the observations and resiudal errors at prior time steps. It combines both Autoregression (AR) and Moving Average (MA) models.
Auto Regression Integrated Moving Average: This method models the next step in the sequence as a linear function of the differenced observations and residual errors at prior time steps. It combines both Autoregression (AR) and Moving Average (MA) models as well as a differencing pre-processing step of the sequence to make the sequence stationary, called integration (I).
Projection Interval: Determines the period of time demand is generated for. For example, select Weekly to project how much demand is expected per week.
Projection Start Date: The first date of the period you want to forecast demand for is displayed automatically based on the projection interval selected.
Projection Duration: Define the number of periods to generate projected future demand. For example, enter 6 to generate demand over a six months period.
Historical Duration: Define the number of periods in the past to calculate the next moving average value. This field is visible only if the projection method is set to Rolling Average.
Location: Select a location. Odoo will look for previous sales from this location only.
Products: List of products shows up whose Replenishment Method is set to Demand Planning.
Click Submit.
Monitoring the Demand Plan Status
After you have submitted the demand plan generation page, some plans may take time to be generated. You can check the logs of plan generation to monitor progress.
To monitor demand plan logs:
Go to Demand Planning > Demand Forecasting > Product Demand Plan Logs.
The page shows a list of submissions. For each line, the following shows:
Product along with the best parameter value chosen by the projection method
Comments about the status. Gives message "Projection completed successfully." on successful completion else the exception message.
Link to the Demand Plan page.

Viewing and Editing a Demand Plan
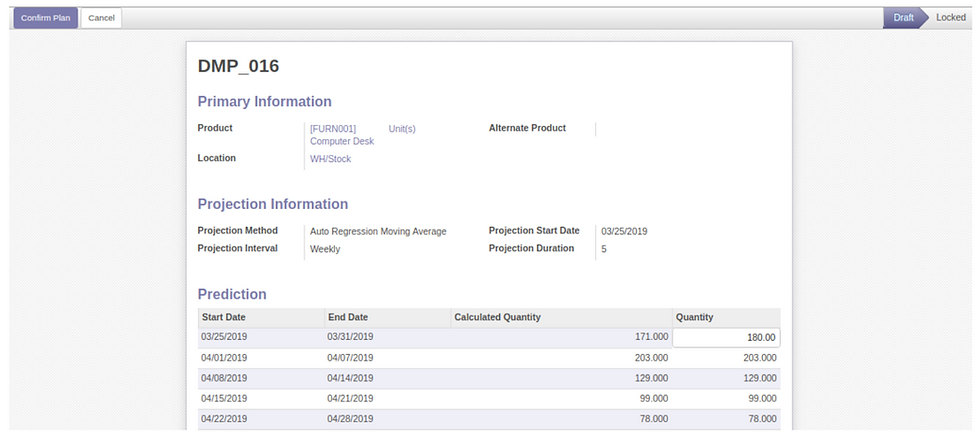
After a demand plan is originally created, you can open the plan to view or edit the plan details. For example, you may wish to edit some of the calculated projection totals, or delete a plan. Remember, you can edit or delete the plan only in draft stage. Once it is locked, then it can be used only for generating Supply Plans.
To view or edit an existing Product Demand Plan:
Go to Demand Planning > Demand Forecasting > Product Demand Plan.
You can alter only the calculated demand for a particular period:
The calculated quantity is for reference only.
A new number can be entered in the Quantity field to change the demand quantity for each line. Enter an amount to revise the demand plan for that interval.
To confirm a Product Demand Plan:
Once the user is satisfied with the projected demand, the plan can be locked by pressing Confirm Plan button. Prior to this, user can re-generate product demand plan using different Projection Method and Projection Interval.
Remember, plan once locked cannot be deleted or modified.
Supply Plan
User should belong to Supply Planning Manage group in order to have access to this feature.
Generate Product Supply Plan
After you have created demand plans, you can create individual supply plan for specified products. The supply plan details orders to be placed for products that are recommended based on the projected demand, safety stock level and lead time.
When you generate supply plans from your demand plans, Odoo can create future manufacturing orders or purchase orders to be able to replenish products in appropriate quantities as they are needed.
Also, the supply plan incorporates lead times so you place orders in time. Purchase orders generated from supply plans use the first vendor from the product's seller list. This can be changed in supply plan before locking it.
If any draft plan exist which coincides with the current plan, then it will be deleted. If any locked plan exist during that period, then it will block creation of any new plans.
To create supply plans:
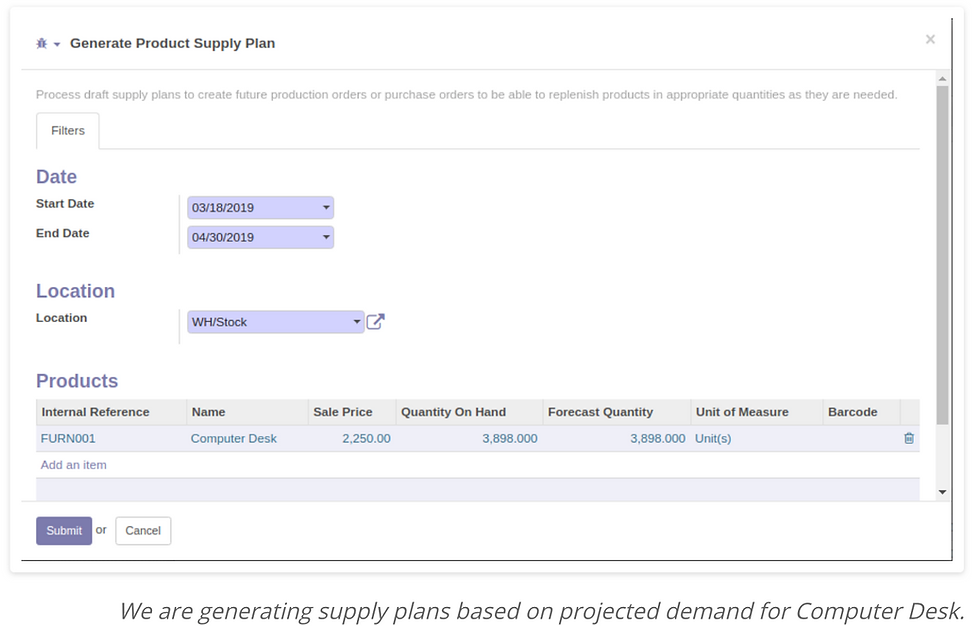
Go to Demand Planning > Supply Plan > Generate Product Supply Plan.
Start Date: Determines the earliest demand plan date to be used for creating supply plans. Verify the default current date or enter another date.
End Date: Determines the latest demand plan date to be used for creating supply plans. For example, if you enter July 30, then supply plans are created based on demand between the current date and July 30th.
Location: Select a location. Odoo will look for demand from this location only.
Products: List of products shows up whose Replenishment Method is set to Demand Planning.
Click Submit.
Viewing and Editing a Supply Plan
After you generate supply plans for a product, you can review the plans to verify the quantities suggested for replenishment. This review enables you to identify products that may need a higher or lower quantity ordered than is calculated by Odoo. You can change these quantities on the supply plan, and the corresponding order you create will match the quantities indicated on the supply plan.
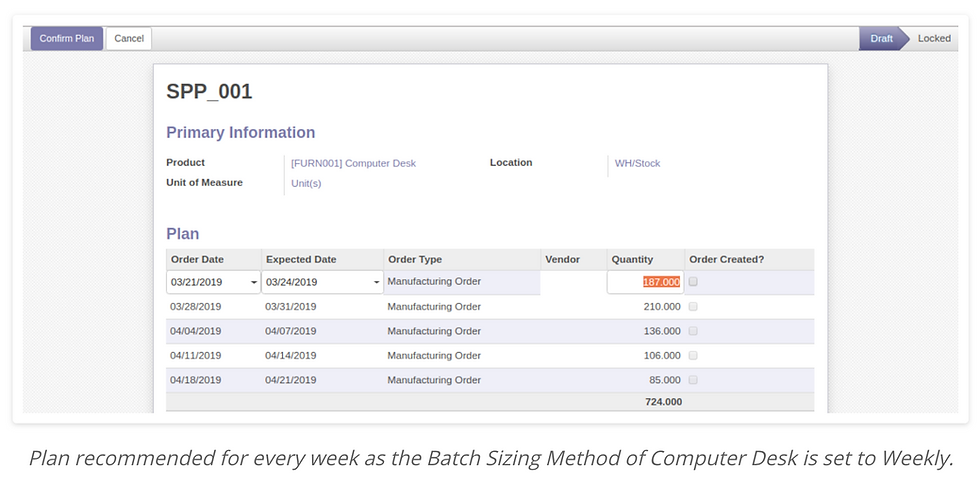
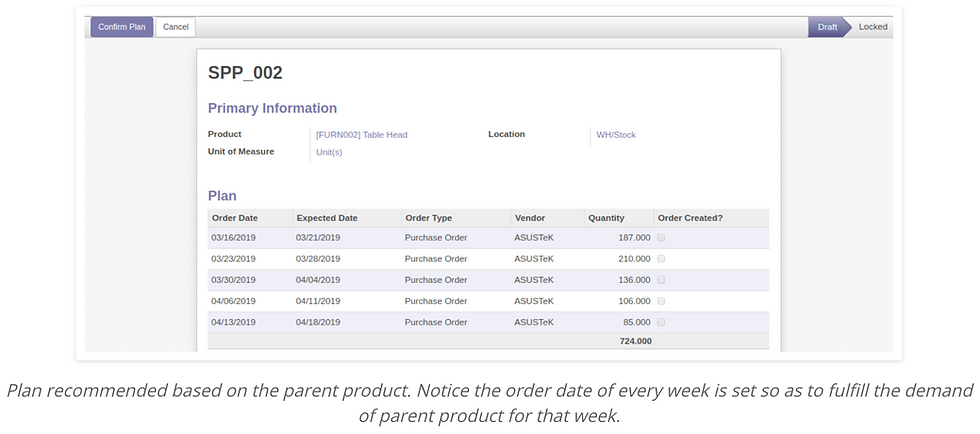
For example, here are the plans created by Odoo for product Computer Desk.

To view or edit a supply plan:
Go to Demand Planning > Supply Plan > Product Supply Plan.
You can alter following fields in draft state:
Order Date: It is the transaction date used for purchase orders or manufacturing orders created.
Expected Date: It is the date you expect the products to be received or produced into the warehouse.
Vendor: By default Odoo fetches the first vendor in product's seller list. Remember, only the vendors configured in the seller list will appear here. You can change it if you wish to buy product from other vendor.
Quantity: It displays the recommended number to replenish based on demand for that period.
To confirm a Product Supply Plan:
Once the user is satisfied with the dates and quantities, the plan can be locked by pressing Confirm Plan button. Prior to this, user can re-generate product supply plan for different time intervals.
Remember, plan once locked cannot be deleted or modified.
Order Creation
User should belong to Supply Planning Manager group in order to have access to this feature.
Create Purchase Order
For mass purchase order creation:
Go to Demand Planning > Order Creation > Create Purchase Order.
Only locked supply plan lines will display here.
Check the box for the lines you want to create orders for.
Under Actions, click Create Orders.
Click Submit.

Now, the purchase order will be created for these products. For every line, Order Created box will be checked and corresponding PO number will be displayed.

Create Manufacturing Order
For mass manufacturing order creation:
Go to Demand Planning > Order Creation > Create Manufacturing Order.
Only locked supply plan lines will display here.
Check the box for the lines you want to create orders for.
Under Actions, click Create Orders.
Click Submit.

Now, the manufacturing order will be created for these products. For every line, Order Created box will be checked and corresponding MO number will be displayed.

Technical Details
Installing Libraries
You have to install these following libraries:
Pandas: Pandas is a very popular library that provides high-level data structures which are simple to use as well as intuitive. It has many inbuilt methods for grouping, combining data and filtering as well as performing time series analysis.
Statsmodel: Statsmodels is a library for Python that enables its users to conduct data exploration via the use of various methods of estimation of statistical models and performing statistical assertions and analysis.
Scikit-Learn: Scikit-learn is an open source Python library that has powerful tools for data analysis and data mining. Scikit-learn offers an extensive range of built-in algorithms that make the most of data science projects.
Pyramid: It is a statistical Python library used for estimating optimal parameters for ARIMA projection method.
Technical Note
Future projection is done based on all of the historic sales in the system. Hence, it is important to have ample historical data in the system.
Demand Planning app uses the following logic to evaluate a given projection method:
For AR, MA, ARMA models:
First, we hold the last 33% of data back and evaluate forecasts on this data. Meaning first 66% is used as the training data and the remaining as test data.
Mean squared error (MSE) method is used to find model's accuracy.
Range of each parameter is set from 1 to 10. It then does grid search to find the parameter combination which gives least MSE value.
For ARIMA model:
We use pyramid library to find the best parameter combination. If data is non-stationary or is unable to fit in the model, then it logs appropiate exception message.
For Odoo Implementation Customisation integration Contact : Palmate Technologies

Comments